The Two “Treadmill Desk” Office Update #2
 The treadmill has been assembled, the desk has been partially constructed, and wonderfully, almost everything is going according to plan for the second treadmill desk project.
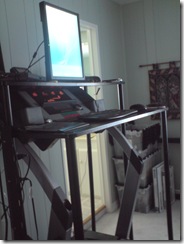
With regard to the desk, this is the part of the plan that I have changed. Originally I intended to use chrome shelving, but after measuring the treadmill and determining the position of the control panel and hand rails, which the user of the treadmill desk does not want to reposition at this time, the intention is to use a similar desk construction to the one I have on my treadmill. I am using the cheaper, though less sturdy plastic pipes and particleboard shelves, self-assembly shelving units from “Real Organized” that can be purchased at Lowes.
I will have to modify the lower part of the desk to make it fit snugly around the treadmill handrails and the heart rate monitoring handgrips. Other than that minor modification, which should not take more than 20 minutes with a band saw and a wood rasp, everything else worked out just great.
I would link to the parts that I used for the desk but unfortunately the Lowe’s website does not list the items. All I can do is give you the part numbers from the boxes and direct you to visit the nearest store, if you are interested in assembling a similar desk.
The parts that make up the desk portion of the treadmill desk, are:
- 2x (Item #253664) Pack of [Feet and tops] – You will need six feet and six tops.
- 3x (Item #253660) Pack of XL (16”) Tube Legs
- 1x (Item #253656) Pack of L (12”) Tube Legs
- 1x (Item #253654) Pack of S (8”) Tube Legs
- 1x or 2x 48”x16” Wood shelf
- 1x 48”x16” Glass shelf – This allows you to see the treadmill console below the 2nd-tier of your desk.
If you have a narrow treadmill and do not require a wide desk, the 36” shelves would also work. I just happen to like lots of desk space to spread my work out on.
Total cost for the Real Organized desk parts should be between $50 and $90 depending on your desk and the city you purchase them in.
You require this many parts because if you are making desks like I have at the office, which are two-tiered, you will require six legs total.
The Real Organized free-standing shelving units are designed to have multiple shelves and this is how the legs of the unit maintains rigidity and strength. Unfortunately, unless you disassemble your treadmill, removing the upright arms that support the console and remove the handrails, you cannot put extra shelves in. My solution to this problem is to add in supports between the legs by taking a few pieces of wood and drilling them with holes the same size as the holes in the Real Organized shelves.
With that said, for the extra supports, you will also need: 3x 48” x 3” x ¾” pine and 2x 16” x 3” x ¾” pine, drilled at the appropriate locations to accommodate the legs of the desk. These pieces of wood will strengthen and stiffen the desk legs. You can drill these holes with a wood spade drill bit which can also be purchased at Lowe’s. You will need a ¾” drill bit such as the one found in this package.
The two treadmill desks that are in current use at the office are slightly different from each other because the treadmills are different models. For your own treadmill desk, I recommend purchasing the plastic shelving parts and just two shelves at first, construct the desk, and then determine what other wood will be require to strengthen the legs. If you buy too many legs or shelves, you can always return them directly to Lowes once your treadmill desk construction project is complete.
Total construction time for the first treadmill desk was about 2 hours, for the second treadmill desk, it was 20 minutes. The first desk I had to experiment with and figure out what wooden supports needed to go where. With the second treadmill desk, it was just a matter of measuring, cutting and drilling the extra support.
You may need to cut small corners out of one part of your desk, on the shelf that holds the keyboard and mouse. This necessity will be dictated by your particular style of treadmill.
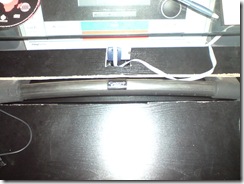
On my Nordic Track Solaris I had to cut out a long hole in the middle of the keyboard shelf (shown in the picture before sanding and painting) to accommodate the heart rate monitoring bar.

I could have raised up the desk height by 1” which would have solved this problem, but then I would not be able to determine my heart rate without an external heart rate monitor.
This is now a moot point, the shelf cut out and treadmill heart rate handgrip bar are now obsolete as I use an external heart rate monitor. The handgrip bar is no longer used and I will be removing it in the next week or two as it just takes up desk space.